
On this page
- Before You Begin
- Product Cross References
- Printing Packing Slips and UPS Shipping Labels
- Internet Explorer
- Google Chrome
- Mozilla Firefox
- Reconciling Packing Slips with Missing Shipping Labels
- Disabling/Enabling Auto-Close by Print Batch
- Disabling a print batch that is enabled for Auto-Close
- Enabling a print batch that is disabled for Auto-Close
- Disabling/Enabling Auto-Close by Order
- Disabling an order that is enabled for Auto-Close
- Enabling an order that is disabled for Auto-Close
- Auto-Close - How It Works
- Scheduling a UPS Pickup
- Shipping Confirmations
Instructions for Vendors with integrated/combined Packing Slips and Shipping Labels, and who are enrolled in the VendorBridge Auto-Close Program.
This guide will assist you with printing packing slips, reconciling ship-to address errors, and managing print batches and individual orders for eligibility to be Auto-Closed at the end of the shipping day.
Before You Begin
It is recommended that you review the "Information for First Time Users" page on VendorBridge to ensure that your browser is properly configured to preview/print the packing slips with integrated shipping label barcodes that you will generate.
Product Cross References
You may need to apply a cross-reference for your products before you are able to begin printing and processing your first orders for those products. A cross-reference will need to be applied once for each new product that is transmitted to VendorBridge for the first time. Once applied, you will never need to save the cross-reference for the same product again.
You will know that a cross-reference needs to be applied if the message shown below appears on the VendorBridge home page. Please follow the instructions provided in the "Quick Cross References" guide to complete this task. If you do not see the below message, your products are already listed on VendorBridge and you are ready to begin printing and processing orders.

Printing Packing Slips and UPS Shipping Labels
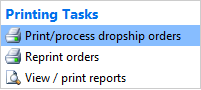
Log on to VendorBridge and click “Print/process dropship orders” as shown below.
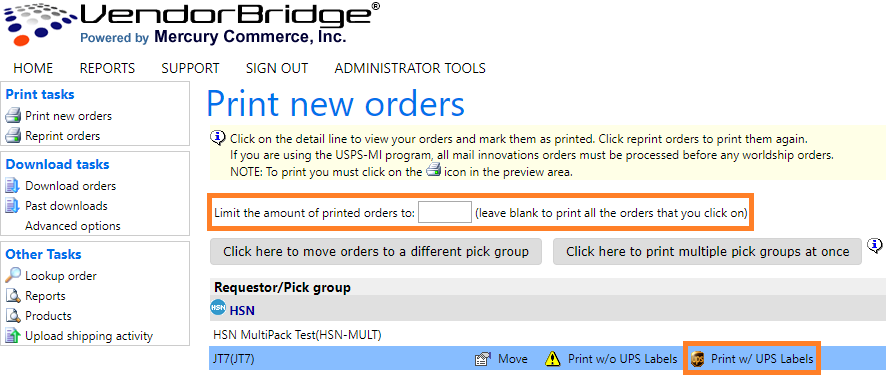
Choose the Requestor and Pick Group from which you would like to print and hover over it with your mouse. Printing options will then appear to the right. Click “Print With UPS Labels” as shown below. If you would like to limit the number of orders that can be printed, enter a specific number in the box at the top of the page.
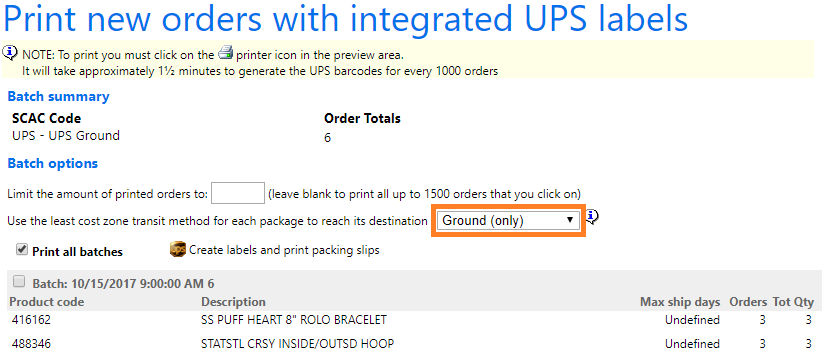
The default shipping method for packages where the shipping method is undefined by the retailer is “Ground”. This can be changed to either Overnight AM, 1-Day Saver, 1-Day, 2-Day, 3-Day, or 4-Day. Only change the default service level of ground if your product must be shipped at a higher service level as per your agreement with the retailer.
Note: VendorBridge will automatically upgrade only the orders that require it based on the transit days from your Ship-From Zip Code to the Destination Zip Code. For example, if you select the 2-Day upgrade option for the Least Cost Transit Zone, only the orders that will take longer than two days to reach their destination will be upgraded to the 2-Day service type. All other orders will remain as Ground service, except where a more expedited service type was defined. If a retailer specifies 1-Day on a particular order and you choose the 2-Day upgrade, the 1-Day service will still take precedence over your selection and the shipping label will be generated accordingly.
Once you have chosen a Least Cost Transit Zone as an override, click “Create labels and print packing slips” as shown below.
After clicking the link, the packing slips with the integrated shipping labels will be generated on a new page. The options for printing the packing slips/shipping labels will vary depending on the browser that you are currently using to access VendorBridge. Please skip to the section below that is appropriate for you:
Internet Explorer
Note: Please be sure that you have reviewed the "Information for First Time Users" page on VendorBridge to ensure that Internet Explorer is properly configured to preview/print the packing slips.
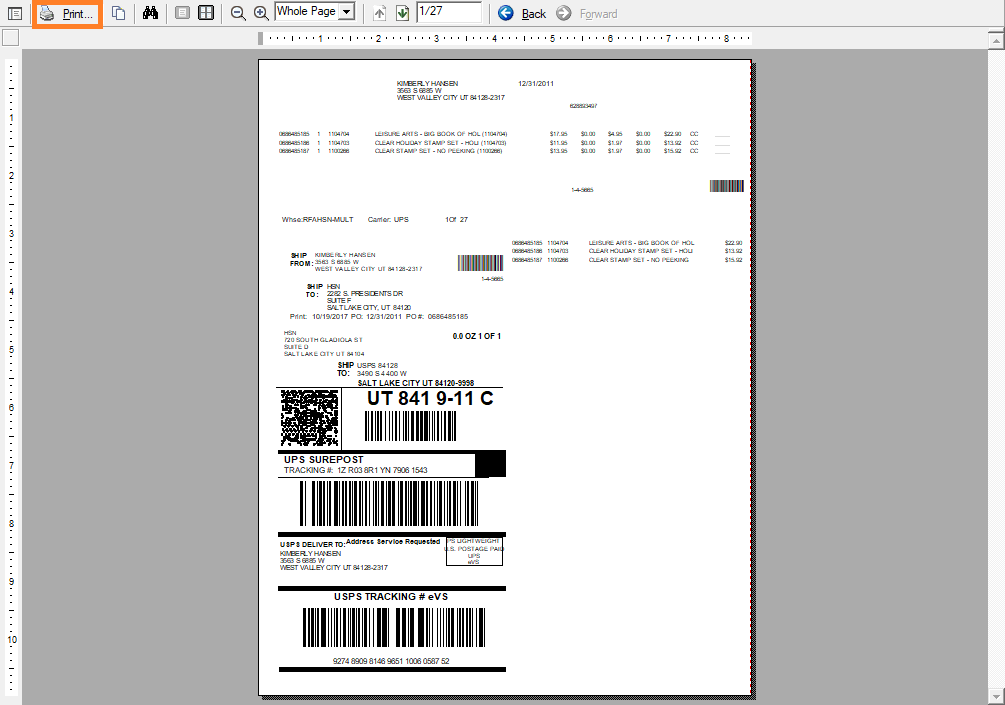
You will be able to print the packing slip using the "Print" button on the toolbar at the preview window, as shown below.
Google Chrome
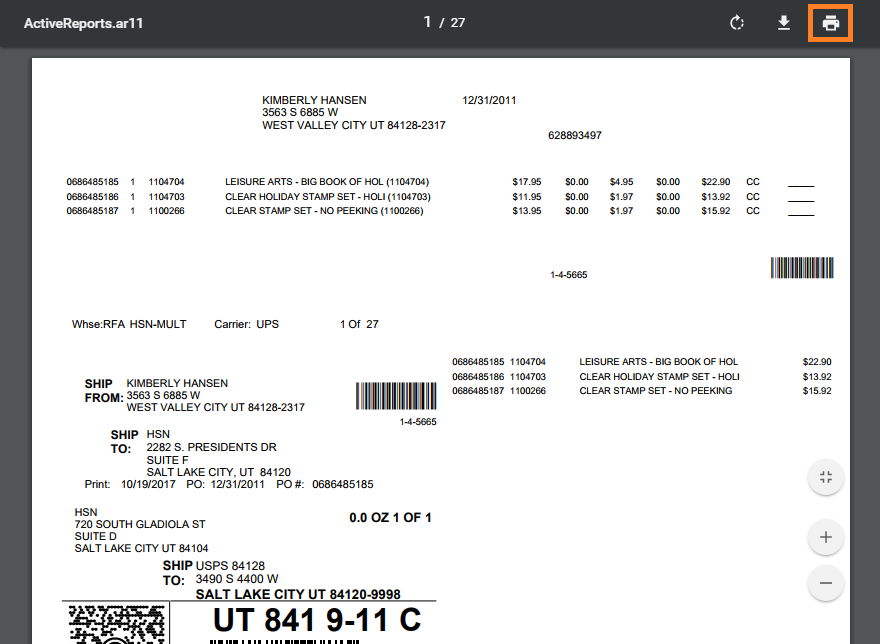
You will be able to print the packing slip using the "Print" button on the toolbar in the top right corner of the preview window, as shown below.
Note: You may need to move your mouse over the top section of the packing slip preview before the toolbar will appear, as Chrome sometimes automatically hides the toolbar when not in use.
Mozilla Firefox
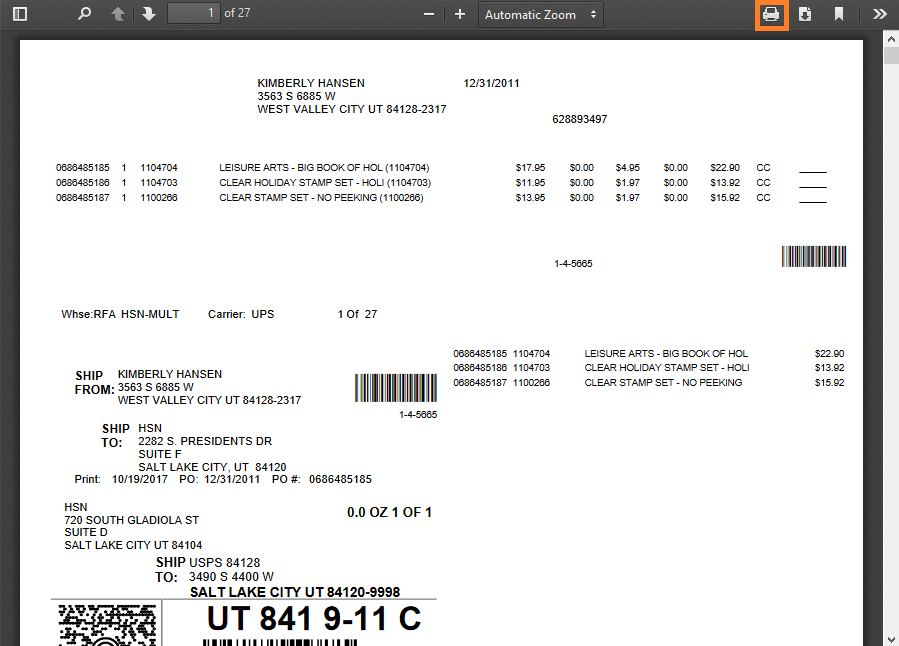
You will be able to print the packing slip using the "Print" button on the toolbar at the preview window, as shown below.
Reconciling Packing Slips with Missing Shipping Labels
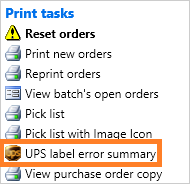
Though it is rare, packing slips can be generated with missing shipping labels if VendorBridge detects that there is an issue with the ship-to address or service type for the order. If you see that you have packing slips that are missing a shipping label, you will be able to view the "UPS Label Error Summary" and work through any address issues to recreate the packing slip with a usable shipping label.
You will be able to navigate to this summary using the link shown below, which is located under the "Print Tasks" header on the left side of the Print Preview screen for the print batch:
This will bring you to a list of the orders in issue, including a message regarding the type of error that occurred. To resolve the issue with the order, click on "Apply Correction" as shown below:

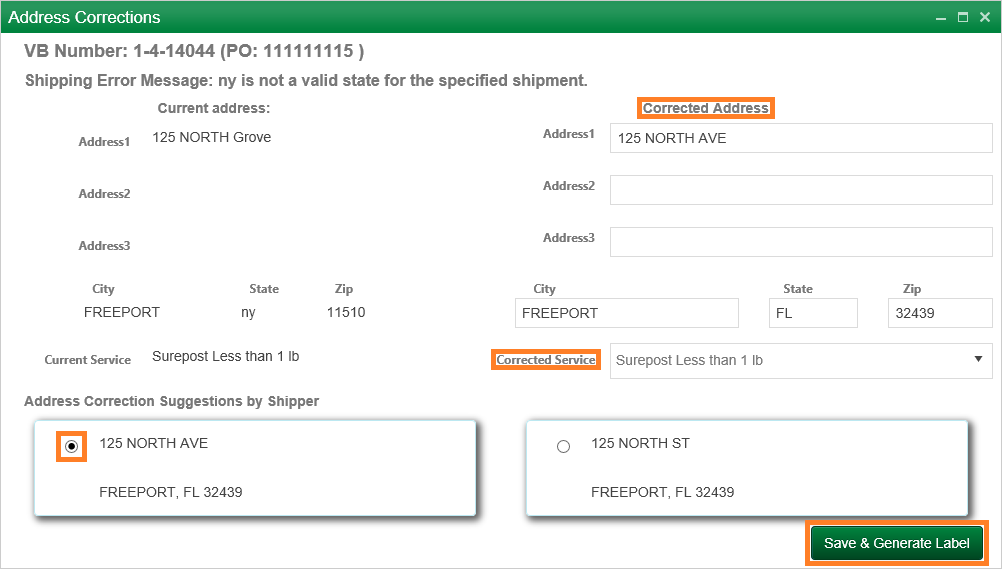
A new window will appear allowing you to edit the ship-to address and service level. You may type in the corrected address manually or select one of the suggestions at the bottom of the window, as shown below.
Once you have made all of the necessary changes, click the "Save & Generate Label" button in the bottom right corner.
You will then be redirected back to the "UPS Label Error Summary" screen, and a new tab will open in your browser that displays the Print Preview for the single packing slip with the shipping label for you to print, specific to the single order that you have just corrected. You may print the single corrected order at this time.
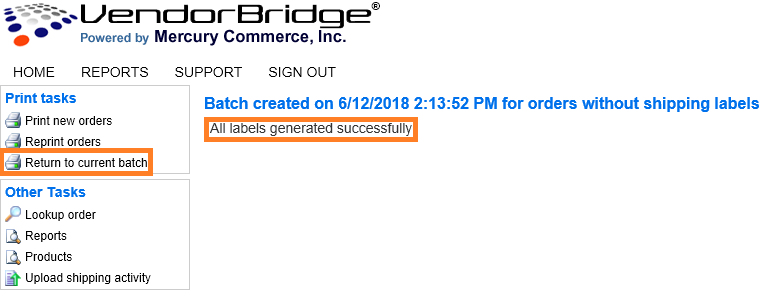
Alternatively, you may close the tab to continue working to resolve any remaining orders in issue on the "UPS Label Error Summary" screen so that the correct packing slip batch can be printed at the same time. Once you have resolved the errors for all orders, the summary screen will alert you that all labels have been generated successfully, as shown below.
You may then click the "Return to current batch" link on the left, as shown below, to revisit the Print Preview page for the order batch, which will now display the entire packing slip batch with all shipping labels for you to print.
Disabling/Enabling Auto-Close by Print Batch
Disabling a print batch that is enabled for Auto-Close
By default, all print batches are enabled for Auto-Close.
Follow the instructions in the "How do I reprint orders?" article to navigate to the print batch for which Auto-Close should be disabled or delayed.
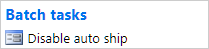
If the print batch is currently enabled for Auto-Close, you will see the option to disable it. This option will appear on the left side of the Print Preview screen for the packing slip batch under the "Batch Tasks" header, as shown below:
You will then be presented with a window to confirm that you want to disable the batch. Optionally, you may enter a future date to automatically enable the batch for Auto-Close if you know that the batch will ship on a certain date. If you are unsure when the batch will ship, you may leave this blank and manually enable the batch later when you are ready.
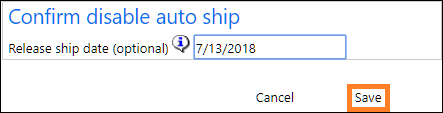
Click save, as shown above, to confirm that the batch should be disabled for Auto-Close.
Enabling a print batch that is disabled for Auto-Close
By default, all print batches are enabled for Auto-Close. A print batch will only display as disabled if a user has explicitly set the batch to the disabled status.
Disabled batches will appear under a pre-sorted category on the home page. To view the list of disabled batches, click the "View batches with disabled ASN's" category, as shown below:
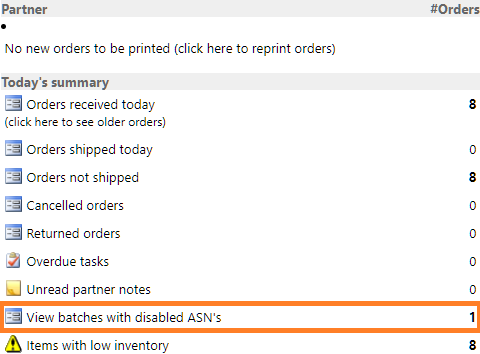
You will then be brought to the list of disabled batches, as shown below:

Click on the batch that you would like to enable. You will then be brought to the Print Preview screen of the print batch. The option to enable Auto-Close will appear on the left side of the Print Preview screen under the "Batch Tasks" header, as shown below:
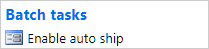
You will then be presented with a window to confirm that you want to enable the batch.
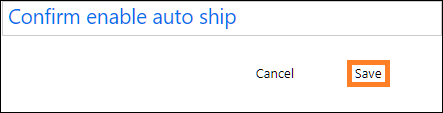
Click save, as shown above, to confirm that the batch should be enabled for Auto-Close.
Disabling/Enabling Auto-Close by Order
Disabling an order that is enabled for Auto-Close
By default, all print batches are enabled for Auto-Close.
Follow the instructions in the "How do I look up an order?" article to navigate to the order for which Auto-Close should be disabled or delayed.
If the order is currently enabled for Auto-Close, you will see the option to disable it. This option will appear on the right side of the Order Information screen for the individual order under the "Order Tasks" header, as shown below:
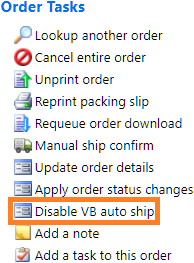
You will then be presented with a window to confirm that you want to disable the order. Optionally, you may enter a future date to automatically enable the order for Auto-Close if you know that the order will ship on a certain date. If you are unsure when the order will ship, you may leave this blank and manually enable the order later when you are ready.
Click save, as shown above, to confirm that the order should be disabled for Auto-Close.
Enabling an order that is disabled for Auto-Close
By default, all orders are enabled for Auto-Close. An order will only display as disabled if a user has explicitly set the order to the disabled status.
Follow the instructions in the "How do I look up an order?" article to navigate to the order for which Auto-Close should be enabled.
If the order is currently disabled for Auto-Close, you will see the option to enable it. This option will appear on the right side of the Order Information screen for the individual order under the "Order Tasks" header, as shown below:
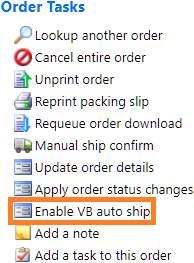
You will then be presented with a window to confirm that you want to enable the order.
Click save, as shown above, to confirm that the order should be enabled for Auto-Close.
Auto-Close - How It Works
Scheduling a UPS Pickup
A UPS pickup for the current day is automatically scheduled when you request automatic pickups with VendorBridge which can be enabled if necessary. When packing slips with integrated shipping labels are created in VendorBridge, a request is made for UPS to come to your location for a pickup. UPS may reject the pickup request for the day if the orders are printed too late in the day as UPS only allows for pickups to be scheduled earlier in the day with varying times.
Shipping Confirmations
VendorBridge will automatically close orders with the appropriate tracking information once per day at 9:00 PM Eastern Time. This will only apply to orders and print batches that have Auto-Close enabled.
By default, all orders are enabled for Auto-Close. An order will only display as disabled and remain open if a user has explicitly set the order to the disabled status.
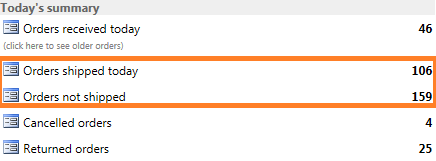
At the time specified above, the "Today's Summary" section on the VendorBridge home page (shown below) will be updated accordingly. The "Order's Shipped Today" and "Orders Not Shipped" categories should now reflect accurately based on what has been confirmed as shipped as of today.
Once an order is closed, VendorBridge automatically transmits the Advanced Shipping Notice (ASN) and an electronic invoice, if eligible, to the retailer on your behalf.
If you have any questions or concerns regarding these procedures, please feel free to contact Mercury Commerce, Inc. for assistance.
Still stuck?
Tell us what you tried and we will take it from there. We will know which article you were reading.